Best Settings for 3D Printed Nameplates
3D printing nameplates seems simple because they are relatively flat, but achieving a flawless top surface finish and sharp, crisp text requires optimization. Since nameplates are viewed closely on desks or doors, any blemishes, gaps, or over-extrusion will be immediately visible. Here are the optimal slicer settings to print gorgeous nameplates on any FDM printer. We will explore physical configurations, surface finishing techniques like ironing, and bed tramming priorities.
Recommended Settings for Nameplate Variations
Let's look at the recommended settings for the different nameplate models available on DesignForge:
1. Nursery Nameplates & Kids Desk Nameplates
These signs often feature playful fonts, rounded edges, and cute design themes. To make the letters pop and keep the layers clean, use the following profile:
- Layer Height: 0.20mm for the base plate, but configure a Variable Layer Height (between 0.12mm and 0.16mm) for the text portion. This reduces the stepped "staircase" effect on curved letter edges and makes them look smooth.
- Infill Density: 15% to 20% infill is optimal. Use the Gyroid pattern; it provides equal strength in all directions and prevents warping.
- Wall Loops: Use 3 walls. This ensures that the borders and the letters have a solid, sturdy shell.
- Monotonic Top/Bottom Order: Enable this setting. It forces the print nozzle to print parallel lines in a single direction, which completely eliminates ugly light-reflection variations across the flat top surface of your nameplate.
- Cooling: Set the cooling fan to 100% starting from layer 2. Excellent cooling ensures that the letters print with crisp edges and do not droop.
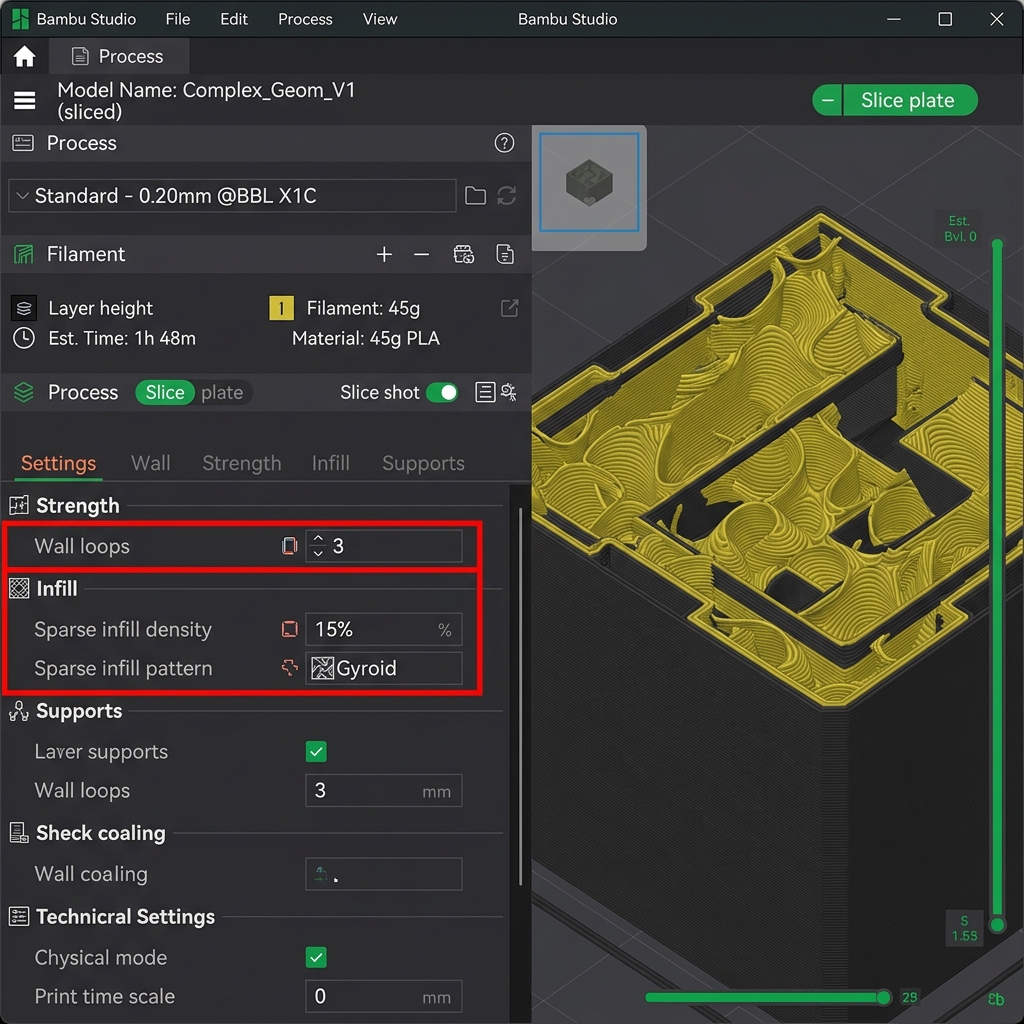
Bambu Studio Walls and Sparse Infill settings (highlighted in red)
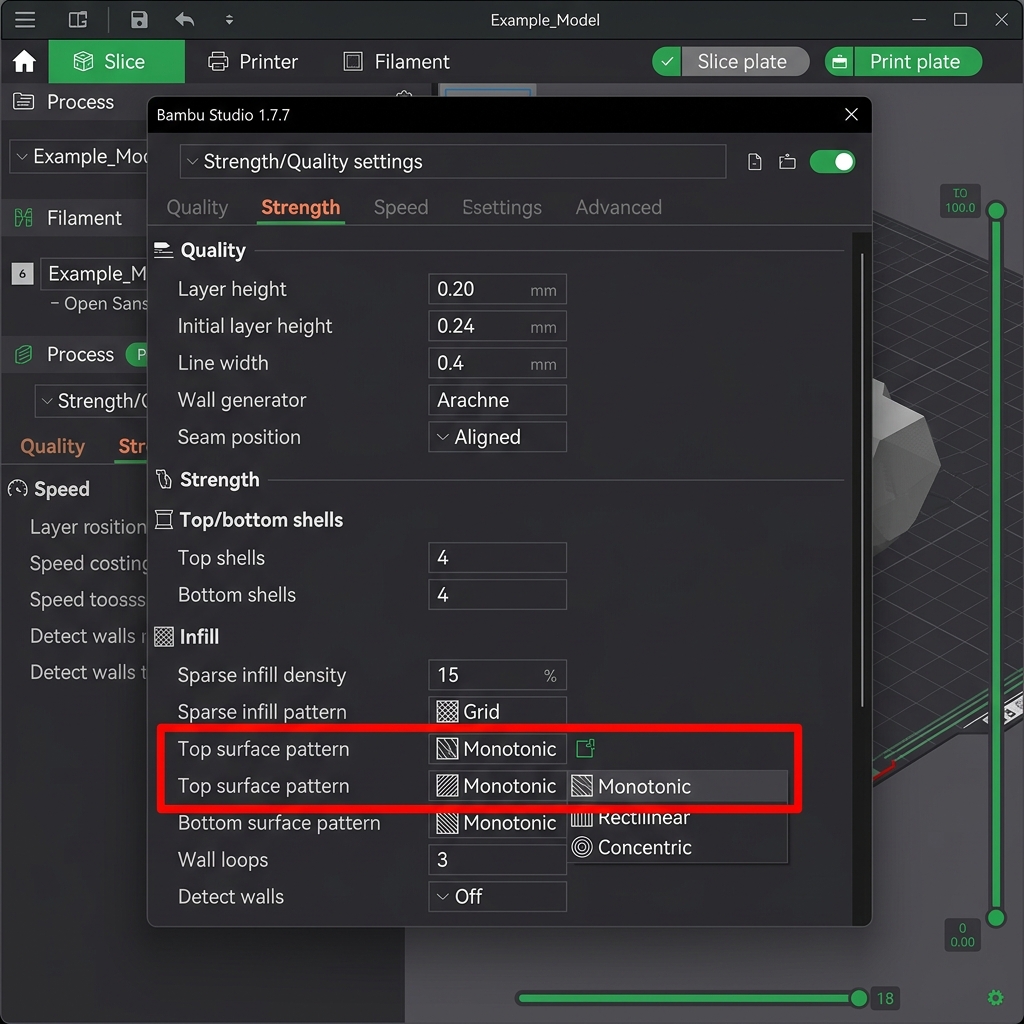
Configuring Top surface pattern to Monotonic (highlighted in red)
2. Teacher Desk Nameplates
Professional teacher nameplates have larger flat sections and sharp bevels. To achieve a professional, commercial look, apply these settings:
- Ironing: Enable Ironing on the "Topmost Surface Only". Ironing runs the hot nozzle slowly over the printed top layer without extruding new plastic (or extruding a very tiny 5% amount), melting down any ridges. This yields a matte, incredibly smooth, injection-molded finish. Set ironing speed to 30mm/s with 10% flow rate.
- Print Speed: Slow down the outer wall speed to 50 mm/s and the top surface fill speed to 60 mm/s. Slower speeds prevent ghosting around the teacher's name.
- Top Shell Layers: Set this to at least 4 or 5 layers. This prevents "pillowing" (small bumps or holes in the top surface caused by hot air escaping from the infill layers beneath).

Bambu Studio Ironing configuration (highlighted in red)
Nozzle Selection & Line Width
A standard 0.4mm nozzle is the best all-rounder. However, if the nameplate has very intricate font details or small icons (such as the Segoe symbols), consider using a 0.2mm nozzle. When using a 0.4mm nozzle, setting your slicer's line width to 0.42mm or 0.45mm ensures solid overlap, while setting the outer wall line width to exactly 0.4mm yields maximum precision. A 0.2mm nozzle will require layer heights between 0.08mm and 0.12mm, increasing print time but offering unparalleled textual definition.
Bed Adhesion & Warping Mitigation
Since nameplates have a wide, flat footprint, they are highly prone to warping. As the layers of plastic cool, they contract and pull upward at the sharp corners. To prevent warping: 1. Ensure your print bed is clean. Wash it with hot water and dish soap (Dawn) to remove oils from fingers. 2. Set the bed temperature to 60°C for PLA and 80°C for PETG. 3. Use a Brim of 5mm to 8mm width if printing on a smooth PEI sheet. A brim adds a single-layer-thick ring of plastic around the base, increasing surface area and keeping the corners anchored down. You can easily peel it off after printing. 4. Turn off chamber fans and prevent cold room drafts from hitting the printer, as sudden temperature drops accelerate shrinkage and warp corners.
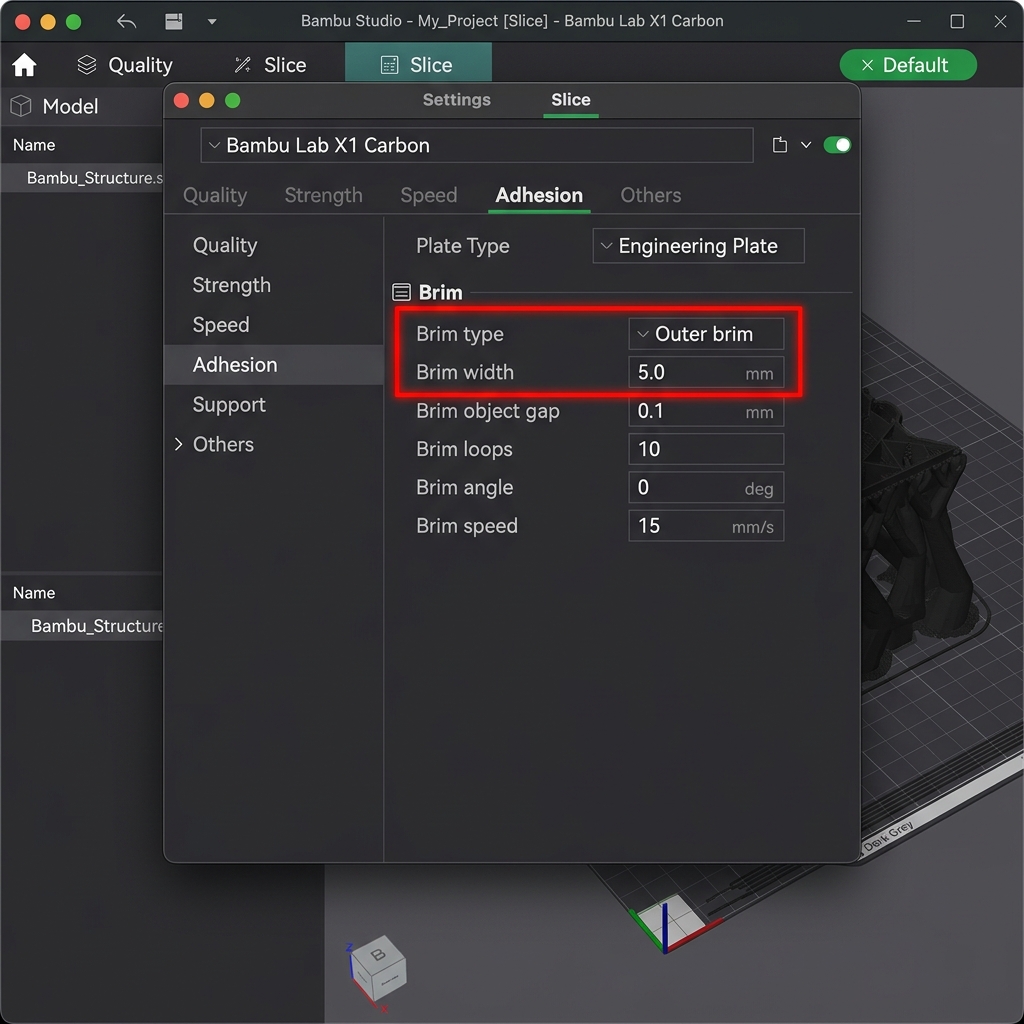
Bambu Studio Brim and Adhesion options (highlighted in red)
Post-Processing Tweaks for Commercial Success
If you plan to sell your printed nameplates, post-processing is where you add massive value. Even the best printed nameplate can have tiny Z-seam lines. Set your slicer's Z-seam alignment to "Aligned" or "Back" to hide the seam in a sharp corner rather than scattering it randomly across the text face. A light sanding with 400-grit wet sandpaper followed by a quick coat of acrylic clear sealer will hide layer lines entirely and make your prints look professionally manufactured. If you print in multiple parts, use high-quality cyanoacrylate (CA) glue with an activator spray to instantly bond letters to the base without messy drips.
Comprehensive 3D Printing Reference Guide
To help you get the best possible results from the DesignForge STL and 3MF generators, we have compiled a detailed reference guide covering troubleshooting, settings, and material handling. Refer to this matrix when configuring your slicer software (such as Bambu Studio, OrcaSlicer, PrusaSlicer, or Cura).
Ultimate 3D Printing Troubleshooting Matrix
| Issue | Primary Cause | Recommended Solution |
|---|---|---|
| Warping / Corner Lifting | Thermal contraction as plastic cools; poor bed adhesion. | Clean build plate with dish soap; increase bed temperature by 5°C; add a 5mm brim; disable drafts. |
| Stringing / Oozing | Wet filament or incorrect retraction settings. | Dry the filament spool; increase retraction distance by 0.5mm; enable travel moves wipe; lower nozzle temp by 5°C. |
| Under-Extrusion | Clogged nozzle, cracked extruder arm, or low flow rate. | Perform a cold pull to clear clogs; check extruder gears; calibrate extruder E-steps; increase extrusion multiplier. |
| Ghosting / Ringing | Frame vibrations at high printing speeds. | Tighten printer belts; place the printer on a heavy, stable surface; reduce acceleration settings or enable input shaping. |
| Pillowing (Top Surface Holes) | Insufficient top layers or poor cooling. | Increase top solid layers to at least 4; increase cooling fan speed; increase infill density. |
Material Profiles & Settings Reference
Every filament type has different temperature profiles and mechanical properties. Use the table below as a starting point:
| Filament | Nozzle Temp | Bed Temp | Cooling Fan | Key Properties |
|---|---|---|---|---|
| PLA (Polylactic Acid) | 190°C - 220°C | 50°C - 60°C | 100% | Easy to print, biodegrades, minimal warping, rigid, brittle. |
| PETG | 230°C - 250°C | 70°C - 80°C | 30% - 50% | Durable, chemically resistant, UV resistant, prone to stringing. |
| ABS (Acrylonitrile Butadiene Styrene) | 240°C - 260°C | 90°C - 110°C | 0% - 20% | High heat resistance, tough, can be acetone smoothed; requires enclosure. |
| ASA (Acrylic Styrene Acrylonitrile) | 240°C - 260°C | 90°C - 110°C | 0% - 20% | Highly UV & weather resistant, ideal for outdoor parts; requires enclosure. |
| TPU (Thermoplastic Polyurethane) | 220°C - 240°C | 40°C - 60°C | 80% - 100% | Highly flexible, rubber-like, impact resistant; print slowly (15-30mm/s). |
Manifold Design & CAD Best Practices
For custom nameplates and keychains to slice correctly in your 3D printing software, they must have watertight (manifold) geometries. Non-manifold geometry occurs when a model contains open edges, self-intersecting faces, or zero-thickness walls. The DesignForge generator utilizes boolean operations at the code level to merge base plates and letter fonts, ensuring perfect manifold geometry in all downloaded STL and 3MF files. When designing custom parts in CAD programs like Fusion 360, SolidWorks, or OpenSCAD:
- Always use Boolean Joins: Ensure overlapping bodies are combined using union operations before exporting.
- Keep minimum wall thickness: Wall features should be at least two times your nozzle diameter (e.g., at least 0.8mm for a 0.4mm nozzle) to prevent gaps.
- Avoid Zero-Thickness Geometry: Avoid faces that share an edge without a joining volume, as this confuses slicer software pathing algorithms.
Slicer Optimization Guidelines
When preparing your files in Bambu Studio, OrcaSlicer, PrusaSlicer, or Cura, apply these techniques for premium quality:
- Ironing: Enabling ironing runs the nozzle slowly over flat surfaces without extrusion to smooth out ridges. Recommended settings: Ironing speed of 30mm/s, flow rate of 10%-15%.
- Monotonic Fill Pattern: Forces parallel top lines to print in a single direction, eliminating light reflection variations and giving nameplates a uniform surface finish.
- Multi-Color Painting in Slicer: If you download our 3MF files, the color metadata is pre-assigned. You can customize coloring by selecting the "Paint Bucket" tool in Bambu Studio or OrcaSlicer, choosing your colors, and clicking the individual extruded letter blocks to color them instantly before sending to your multi-material system (like the Bambu AMS or Prusa MMU). Learn more about this in our Multi-Color 3D Printing Guide.