Understanding Infill Patterns and Density
Infill is the internal structure of a 3D printed object. Unlike wood or metal parts, 3D printed parts are rarely printed 100% solid. Instead, they use a hollow internal grid to save print time, reduce filament weight, and cut costs. Slicers allow you to control two main aspects: Infill Density (percentage of solid plastic inside) and Infill Pattern (the geometry of the internal structure). Choosing the correct combination is essential to optimize both print duration and the mechanical properties of your printed models.
Infill Density Explained
Infill density is measured from 0% (completely hollow) to 100% (completely solid). For most everyday prints, an infill density of 10% to 20% is the sweet spot. It provides ample internal support for top layers while keeping material usage low. If you print something that needs high mechanical strength (like a load-bearing shelf bracket), you should increase this to 30% to 50%. Going above 60% rarely increases part strength significantly; instead, it wastes massive amounts of material and print time. The structural integrity of a print is driven far more by the **number of walls** than the infill density.
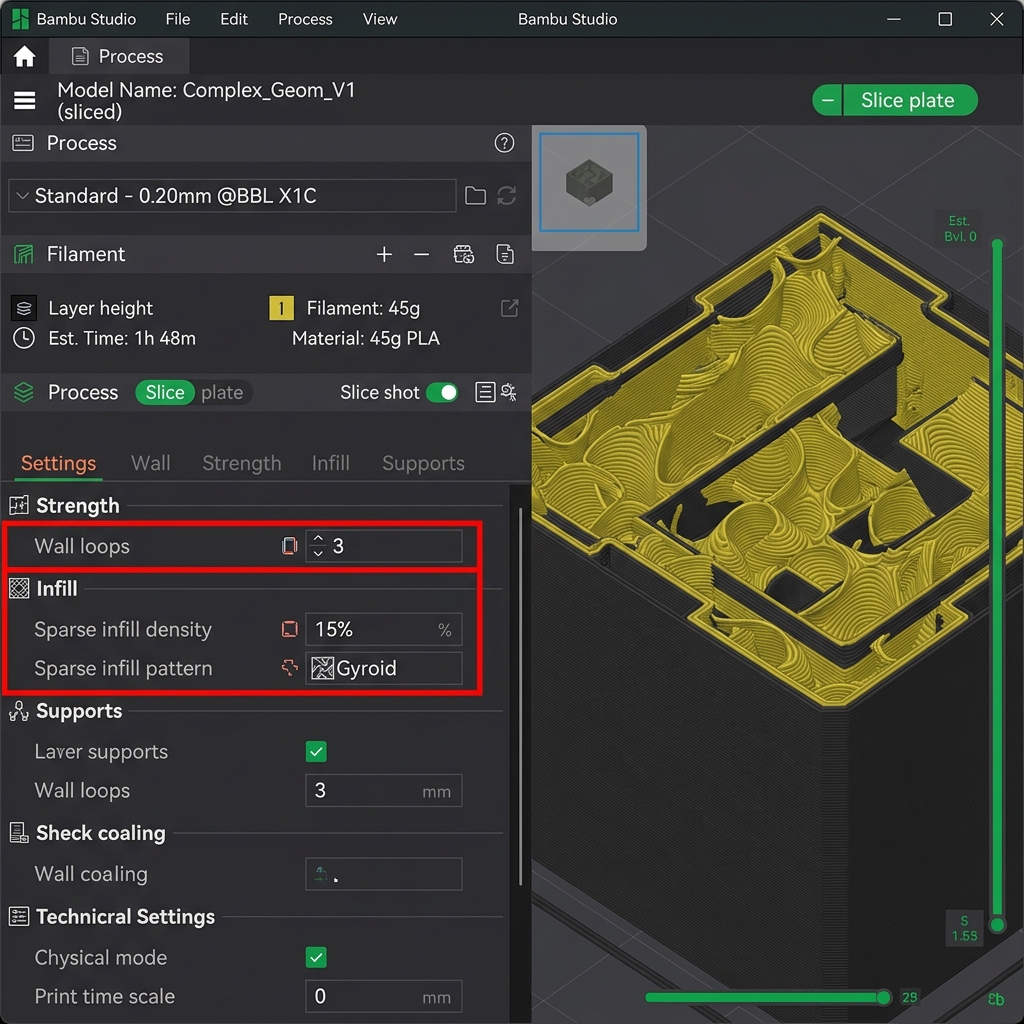
Configuring Wall Loops and Sparse Infill density in Bambu Studio (highlighted in red)
Popular Infill Patterns
Different infill patterns offer unique mechanical properties, print speeds, and extrusion behaviors:
- Grid / Rectilinear: The default pattern. It prints extremely fast and consists of intersecting vertical and horizontal lines. However, because the lines cross over each other on the same layer, it can cause the nozzle to scrape against the intersections, resulting in noise, print defects, and potential nozzle clogs.
- Gyroid: A wave-like 3D pattern. It does not have crossing lines, completely eliminating nozzle scraping. It provides uniform, multi-directional strength and is excellent at absorbing impacts. It looks beautiful and is highly recommended. It also allows water to drain, making it suitable for outdoor parts.
- Honeycomb: Extremely strong and rigid, resembling a natural honeycomb. It is excellent for structural parts but prints significantly slower due to the frequent direction changes of the extruder motor.
- Concentric: Follows the outer contours of the shape. Useful for flexible filaments or transparent materials where you want a clean, uniform look.
Recommended Infill for DesignForge Items
Applying the correct infill to your specific generated designs makes a massive difference in quality and durability:
- Keychains & Pet Tags: Keychains and pet tags are small and thin, so they don't have much internal space. Use 30% infill density with a Grid or Gyroid pattern. Because of their thin cross-section, the higher density helps anchor the keychain loop securely to the base, preventing the loop from snapping under tension.
- Nursery, Kids, & Teacher Desk Nameplates: These flat nameplates require stability to prevent warping, but do not need to support external weights. Use 15% infill density with a Gyroid pattern. Gyroid distributes internal tension evenly, which reduces the curl forces that cause nameplate corners to warp off the print bed.
- Cake Toppers: Cake toppers have long, thin display prongs. Slicing them with a standard grid can create weak points. Slicing with 25% Concentric infill and increasing the wall count to 4 makes the display stick completely solid and sturdy, preventing it from bending or snapping when pushed into dense cakes.
Recommended Print Settings for DesignForge Templates
To ensure high success rates and perfect visual finishes, use the following tested print profiles for our 3D nameplate, keychain, pet tag, and cake topper templates. Adjust your temperatures based on your specific filament manufacturer recommendations.
| Design Type | Filament Type | Layer Height | Infill Profile | Wall Count | Nozzle/Bed Temp | Slicer Optimization & Finish |
|---|---|---|---|---|---|---|
| Nursery Desk Nameplate | PLA | 0.20mm base / 0.12mm text | 15% Gyroid | 3 Walls | 200°C / 60°C | Enable variable layer height on letters; 100% cooling. |
| Teacher Desk Nameplate | PLA or PETG | 0.20mm | 15% Gyroid | 3 Walls | 200°C (PLA) / 240°C (PETG) | Enable Ironing on topmost surfaces only (30mm/s, 10% flow). |
| Kids Desk Nameplate | PLA | 0.20mm | 20% Gyroid | 3 Walls | 200°C / 60°C | Use multi-color pauses at layer transitions for colored letters. |
| Custom Keychain | PETG or TPU | 0.16mm | 30% Gyroid | 3 Walls | 240°C (PETG) / 225°C (TPU) | Slow down outer walls to 40mm/s for small keyring loop strength. |
| Custom Pet Tag | PETG | 0.16mm | 40% Grid | 4 Walls | 240°C / 75°C | Disable Z-hop to reduce fine hair stringing inside small letters. |
| Cake Topper | Food-Grade PLA | 0.20mm | 25% Concentric | 4 Walls | 200°C / 60°C | Coat prong with food-safe epoxy sealant. Avoid supports. |
Expert 3D Printer's Checklist
Before launching any complex print, run through this quick checklist to ensure maximum success and reduce print failures:
- Bed Leveling: Confirm your bed is trammed and that your Z-offset is dialed in with no visible gaps. Run an auto-level mesh before printing large flat objects.
- Filament Drying: Ensure your spool has been kept dry and stored in a sealed container with active silica desiccant. If printing PETG or TPU, pre-dry the filament.
- Build Plate Adhesion: Wipe down the PEI bed surface with 99% Isopropyl Alcohol (IPA) to dissolve finger oils. Do not use acetone on PEI plates.
- First Layer Inspection: Watch the first layer print completely to verify that the bead line is squishing down nicely and anchoring to the plate.
- Slicer Profile: Check that you have configured the appropriate infill pattern (like Gyroid) and turned off supports for flat items.
- Temperature Calibration: Set your hotend and bed temperatures exactly as recommended for your specific filament brand and polymer type.
- Cooling Fan Speed: Keep the part-cooling fan turned off on the first layer to prevent warping, and set it to 100% on subsequent layers for PLA.
Comprehensive 3D Printing Reference Guide
To help you get the best possible results from the DesignForge STL and 3MF generators, we have compiled a detailed reference guide covering troubleshooting, settings, and material handling. Refer to this matrix when configuring your slicer software (such as Bambu Studio, OrcaSlicer, PrusaSlicer, or Cura).
Ultimate 3D Printing Troubleshooting Matrix
| Issue | Primary Cause | Recommended Solution |
|---|---|---|
| Warping / Corner Lifting | Thermal contraction as plastic cools; poor bed adhesion. | Clean build plate with dish soap; increase bed temperature by 5°C; add a 5mm brim; disable drafts. |
| Stringing / Oozing | Wet filament or incorrect retraction settings. | Dry the filament spool; increase retraction distance by 0.5mm; enable travel moves wipe; lower nozzle temp by 5°C. |
| Under-Extrusion | Clogged nozzle, cracked extruder arm, or low flow rate. | Perform a cold pull to clear clogs; check extruder gears; calibrate extruder E-steps; increase extrusion multiplier. |
| Ghosting / Ringing | Frame vibrations at high printing speeds. | Tighten printer belts; place the printer on a heavy, stable surface; reduce acceleration settings or enable input shaping. |
| Pillowing (Top Surface Holes) | Insufficient top layers or poor cooling. | Increase top solid layers to at least 4; increase cooling fan speed; increase infill density. |
Material Profiles & Settings Reference
Every filament type has different temperature profiles and mechanical properties. Use the table below as a starting point:
| Filament | Nozzle Temp | Bed Temp | Cooling Fan | Key Properties |
|---|---|---|---|---|
| PLA (Polylactic Acid) | 190°C - 220°C | 50°C - 60°C | 100% | Easy to print, biodegrades, minimal warping, rigid, brittle. |
| PETG | 230°C - 250°C | 70°C - 80°C | 30% - 50% | Durable, chemically resistant, UV resistant, prone to stringing. |
| ABS (Acrylonitrile Butadiene Styrene) | 240°C - 260°C | 90°C - 110°C | 0% - 20% | High heat resistance, tough, can be acetone smoothed; requires enclosure. |
| ASA (Acrylic Styrene Acrylonitrile) | 240°C - 260°C | 90°C - 110°C | 0% - 20% | Highly UV & weather resistant, ideal for outdoor parts; requires enclosure. |
| TPU (Thermoplastic Polyurethane) | 220°C - 240°C | 40°C - 60°C | 80% - 100% | Highly flexible, rubber-like, impact resistant; print slowly (15-30mm/s). |
Manifold Design & CAD Best Practices
For custom nameplates and keychains to slice correctly in your 3D printing software, they must have watertight (manifold) geometries. Non-manifold geometry occurs when a model contains open edges, self-intersecting faces, or zero-thickness walls. The DesignForge generator utilizes boolean operations at the code level to merge base plates and letter fonts, ensuring perfect manifold geometry in all downloaded STL and 3MF files. When designing custom parts in CAD programs like Fusion 360, SolidWorks, or OpenSCAD:
- Always use Boolean Joins: Ensure overlapping bodies are combined using union operations before exporting.
- Keep minimum wall thickness: Wall features should be at least two times your nozzle diameter (e.g., at least 0.8mm for a 0.4mm nozzle) to prevent gaps.
- Avoid Zero-Thickness Geometry: Avoid faces that share an edge without a joining volume, as this confuses slicer software pathing algorithms.
Slicer Optimization Guidelines
When preparing your files in Bambu Studio, OrcaSlicer, PrusaSlicer, or Cura, apply these techniques for premium quality:
- Ironing: Enabling ironing runs the nozzle slowly over flat surfaces without extrusion to smooth out ridges. Recommended settings: Ironing speed of 30mm/s, flow rate of 10%-15%.
- Monotonic Fill Pattern: Forces parallel top lines to print in a single direction, eliminating light reflection variations and giving nameplates a uniform surface finish.
- Multi-Color Painting in Slicer: If you download our 3MF files, the color metadata is pre-assigned. You can customize coloring by selecting the "Paint Bucket" tool in Bambu Studio or OrcaSlicer, choosing your colors, and clicking the individual extruded letter blocks to color them instantly before sending to your multi-material system (like the Bambu AMS or Prusa MMU). Learn more about this in our Multi-Color 3D Printing Guide.