When to Use Supports in 3D Printing
FDM 3D printers work by melting plastic and depositing it layer by layer, building from the ground up. Because of this, every layer must be supported by the layer beneath it. If a model has a section that extends outward into thin air without anything below it, this is called an overhang. If the overhang is too steep, the nozzle will extrude plastic into empty air, leading to drooping plastic strands and print failures. To prevent this, slicing software can generate temporary support structures that are peeled away after printing.
The 45-Degree Rule
As a general guideline, overhangs that are less than 45 degrees relative to the vertical Z-axis can be printed without support structures. Slicing software achieves this because each new layer overlaps enough with the previous layer (usually about 50%) to stay anchored in place. Overhangs steeper than 45 degrees, and completely horizontal overhangs (called **bridges**), usually require support structures to prevent sagging. Many modern printers with good part-cooling fans can print overhangs up to 60 degrees, but 45 remains the safe baseline.
Support Types: Tree vs. Normal
Modern slicers offer two main types of support geometries, and selecting the correct one affects clean-up time and surface finish:
- Normal / Grid Supports: These build straight vertical columns directly below the overhangs. They are very sturdy and are excellent for flat, horizontal surfaces. However, they use a lot of filament, print slowly, and can be difficult to remove, often leaving rough blemishes on the model surface.
- Tree / Organic Supports: These build hollow branch-like structures that curve around the model, touching it only where support is needed. Tree supports are incredibly easy to remove, use less filament, and preserve the surface finish of your print. They are highly recommended for organic shapes, figures, and cosplay parts.
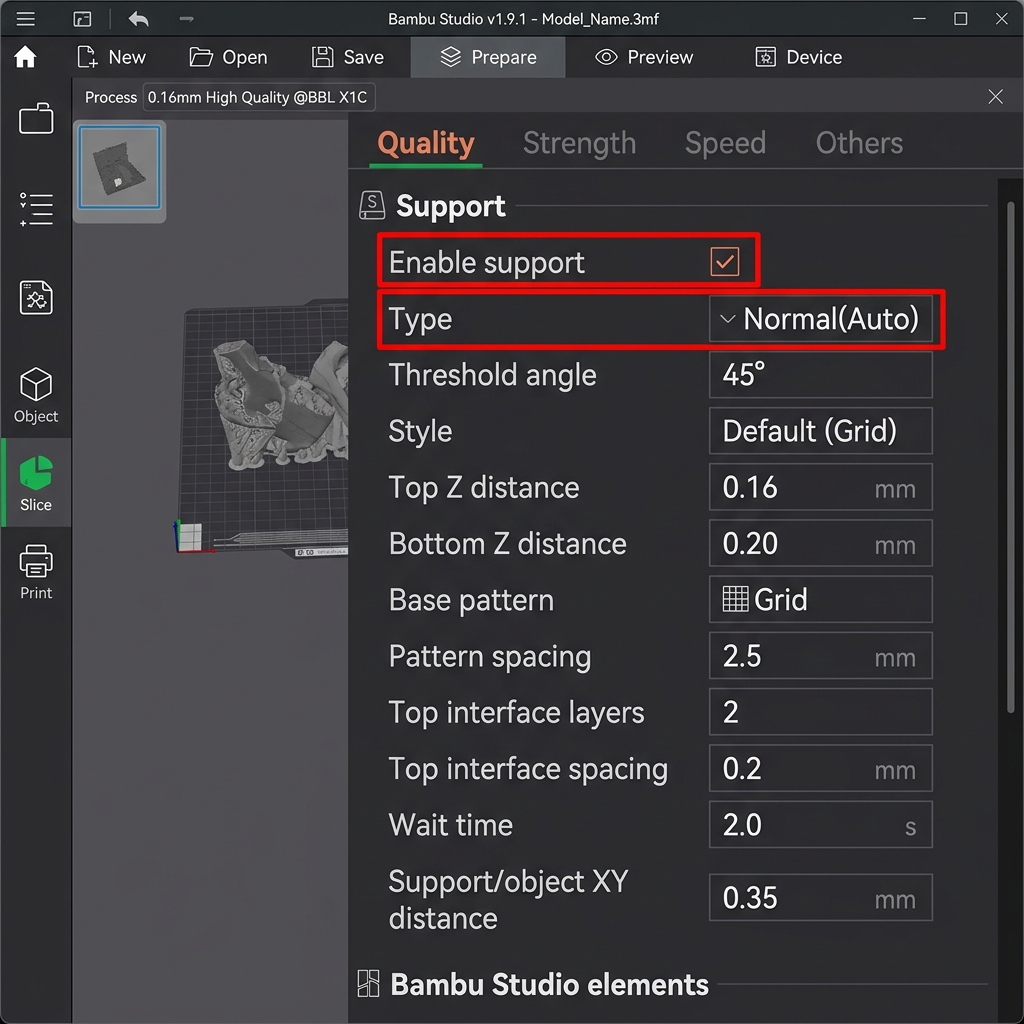
Enabling and configuring supports in Bambu Studio (highlighted in red)
Recommended Support Settings for DesignForge Generators
One of the main design philosophies behind DesignForge is that **you do not need supports** for standard prints if oriented correctly. We design all models with printable angles to save you filament and processing hassle:
- Nursery, Kids, & Teacher Desk Nameplates: Sliced flat on the build plate, these nameplates print straight up. The text is extruded at a 90-degree angle from the flat base plate but is fully supported by the layers of the base. **Do not use supports** for nameplates. Using supports will fill the spaces around the letters with trash plastic, ruining the finish. Disable supports in your slicer profile.
- Keychains & Pet Tags: These are flat items. The keyring hole is printed flat as a circle on the build plate. No parts extend into empty air. **Disable supports** entirely for these models to save time and filament.
- Cake Toppers: Sliced flat on the build plate, the text and the display stick are on the same level. Slicing them flat ensures they have a massive surface area on the bed. **Do not use supports** for cake toppers. Simply drag the file into your slicer, orient it flat on the bed, and print.
Recommended Print Settings for DesignForge Templates
To ensure high success rates and perfect visual finishes, use the following tested print profiles for our 3D nameplate, keychain, pet tag, and cake topper templates. Adjust your temperatures based on your specific filament manufacturer recommendations.
| Design Type | Filament Type | Layer Height | Infill Profile | Wall Count | Nozzle/Bed Temp | Slicer Optimization & Finish |
|---|---|---|---|---|---|---|
| Nursery Desk Nameplate | PLA | 0.20mm base / 0.12mm text | 15% Gyroid | 3 Walls | 200°C / 60°C | Enable variable layer height on letters; 100% cooling. |
| Teacher Desk Nameplate | PLA or PETG | 0.20mm | 15% Gyroid | 3 Walls | 200°C (PLA) / 240°C (PETG) | Enable Ironing on topmost surfaces only (30mm/s, 10% flow). |
| Kids Desk Nameplate | PLA | 0.20mm | 20% Gyroid | 3 Walls | 200°C / 60°C | Use multi-color pauses at layer transitions for colored letters. |
| Custom Keychain | PETG or TPU | 0.16mm | 30% Gyroid | 3 Walls | 240°C (PETG) / 225°C (TPU) | Slow down outer walls to 40mm/s for small keyring loop strength. |
| Custom Pet Tag | PETG | 0.16mm | 40% Grid | 4 Walls | 240°C / 75°C | Disable Z-hop to reduce fine hair stringing inside small letters. |
| Cake Topper | Food-Grade PLA | 0.20mm | 25% Concentric | 4 Walls | 200°C / 60°C | Coat prong with food-safe epoxy sealant. Avoid supports. |
Expert 3D Printer's Checklist
Before launching any complex print, run through this quick checklist to ensure maximum success and reduce print failures:
- Bed Leveling: Confirm your bed is trammed and that your Z-offset is dialed in with no visible gaps. Run an auto-level mesh before printing large flat objects.
- Filament Drying: Ensure your spool has been kept dry and stored in a sealed container with active silica desiccant. If printing PETG or TPU, pre-dry the filament.
- Build Plate Adhesion: Wipe down the PEI bed surface with 99% Isopropyl Alcohol (IPA) to dissolve finger oils. Do not use acetone on PEI plates.
- First Layer Inspection: Watch the first layer print completely to verify that the bead line is squishing down nicely and anchoring to the plate.
- Slicer Profile: Check that you have configured the appropriate infill pattern (like Gyroid) and turned off supports for flat items.
- Temperature Calibration: Set your hotend and bed temperatures exactly as recommended for your specific filament brand and polymer type.
- Cooling Fan Speed: Keep the part-cooling fan turned off on the first layer to prevent warping, and set it to 100% on subsequent layers for PLA.
Comprehensive 3D Printing Reference Guide
To help you get the best possible results from the DesignForge STL and 3MF generators, we have compiled a detailed reference guide covering troubleshooting, settings, and material handling. Refer to this matrix when configuring your slicer software (such as Bambu Studio, OrcaSlicer, PrusaSlicer, or Cura).
Ultimate 3D Printing Troubleshooting Matrix
| Issue | Primary Cause | Recommended Solution |
|---|---|---|
| Warping / Corner Lifting | Thermal contraction as plastic cools; poor bed adhesion. | Clean build plate with dish soap; increase bed temperature by 5°C; add a 5mm brim; disable drafts. |
| Stringing / Oozing | Wet filament or incorrect retraction settings. | Dry the filament spool; increase retraction distance by 0.5mm; enable travel moves wipe; lower nozzle temp by 5°C. |
| Under-Extrusion | Clogged nozzle, cracked extruder arm, or low flow rate. | Perform a cold pull to clear clogs; check extruder gears; calibrate extruder E-steps; increase extrusion multiplier. |
| Ghosting / Ringing | Frame vibrations at high printing speeds. | Tighten printer belts; place the printer on a heavy, stable surface; reduce acceleration settings or enable input shaping. |
| Pillowing (Top Surface Holes) | Insufficient top layers or poor cooling. | Increase top solid layers to at least 4; increase cooling fan speed; increase infill density. |
Material Profiles & Settings Reference
Every filament type has different temperature profiles and mechanical properties. Use the table below as a starting point:
| Filament | Nozzle Temp | Bed Temp | Cooling Fan | Key Properties |
|---|---|---|---|---|
| PLA (Polylactic Acid) | 190°C - 220°C | 50°C - 60°C | 100% | Easy to print, biodegrades, minimal warping, rigid, brittle. |
| PETG | 230°C - 250°C | 70°C - 80°C | 30% - 50% | Durable, chemically resistant, UV resistant, prone to stringing. |
| ABS (Acrylonitrile Butadiene Styrene) | 240°C - 260°C | 90°C - 110°C | 0% - 20% | High heat resistance, tough, can be acetone smoothed; requires enclosure. |
| ASA (Acrylic Styrene Acrylonitrile) | 240°C - 260°C | 90°C - 110°C | 0% - 20% | Highly UV & weather resistant, ideal for outdoor parts; requires enclosure. |
| TPU (Thermoplastic Polyurethane) | 220°C - 240°C | 40°C - 60°C | 80% - 100% | Highly flexible, rubber-like, impact resistant; print slowly (15-30mm/s). |
Manifold Design & CAD Best Practices
For custom nameplates and keychains to slice correctly in your 3D printing software, they must have watertight (manifold) geometries. Non-manifold geometry occurs when a model contains open edges, self-intersecting faces, or zero-thickness walls. The DesignForge generator utilizes boolean operations at the code level to merge base plates and letter fonts, ensuring perfect manifold geometry in all downloaded STL and 3MF files. When designing custom parts in CAD programs like Fusion 360, SolidWorks, or OpenSCAD:
- Always use Boolean Joins: Ensure overlapping bodies are combined using union operations before exporting.
- Keep minimum wall thickness: Wall features should be at least two times your nozzle diameter (e.g., at least 0.8mm for a 0.4mm nozzle) to prevent gaps.
- Avoid Zero-Thickness Geometry: Avoid faces that share an edge without a joining volume, as this confuses slicer software pathing algorithms.
Slicer Optimization Guidelines
When preparing your files in Bambu Studio, OrcaSlicer, PrusaSlicer, or Cura, apply these techniques for premium quality:
- Ironing: Enabling ironing runs the nozzle slowly over flat surfaces without extrusion to smooth out ridges. Recommended settings: Ironing speed of 30mm/s, flow rate of 10%-15%.
- Monotonic Fill Pattern: Forces parallel top lines to print in a single direction, eliminating light reflection variations and giving nameplates a uniform surface finish.
- Multi-Color Painting in Slicer: If you download our 3MF files, the color metadata is pre-assigned. You can customize coloring by selecting the "Paint Bucket" tool in Bambu Studio or OrcaSlicer, choosing your colors, and clicking the individual extruded letter blocks to color them instantly before sending to your multi-material system (like the Bambu AMS or Prusa MMU). Learn more about this in our Multi-Color 3D Printing Guide.